• Discover new ways to elevate your game with the updated DGCourseReview app!
    It's entirely free and enhanced with features shaped by user feedback to ensure your best experience on the course. (App Store or Google Play)

"Nebula" Style Dye Tutorial

Yellow star plastic

Odyssey or anyone else who can provide some intel, I am getting ready to dye a yellow star destroyer and have all the idye colors at my disposal, I am doing an outer ring dye and haven't done much dyeing on yellow. Anyone had better luck with one color over another?

Also, I don't think I am going to be able to float it because it wont reach the outer edge given the discs shape. What is the best method? If I was going to paint it on, should I just use dishwasher gel and straight dye powder with a little acetone? if so, how long after painting it on should I let it set? thanks in advance
 
To dye just the outer rim using the dip method, set the disc in the warm dye, then place a shot glass on top of it. Add water until its "sank" enough to your liking - being careful not to let the dye overflow into it.

or, if using a turntable, mix the dye (1/2 teaspoon) with hot water or acetone (just enough to disolve dye), then add to clear laundry detergent (1/2 shot glass or so). Spin disc on turntable or fan, and paint on circles. Let it sit overnight.

purple doesn't turn out real well. For yellow plastic, I'd go with red, blue, or black. IMHO.
 
I've been waiting for blue dye to do this one. Unfortunately the dye ran and settled into one area. I had to redye to get outer edge. I love the center blue but it could be better if I didn't have that dark ring around it. I used conditioner and I likethe way the center looks from it
 

Attachments

  • 2014-01-22 20.48.51.jpg
    2014-01-22 20.48.51.jpg
    129.7 KB · Views: 259
I added a second layer of nebula dye to the first one I ever did because I didn't like it. Heres the before and after. I noticed that the fabric softener gels up to the point where it is nearly solid, and clings to the plastic - nearly all the dye comes out with the disc.
 

Attachments

  • 0118140910a.jpg
    0118140910a.jpg
    82.3 KB · Views: 92
  • 0126141717a.jpg
    0126141717a.jpg
    137.3 KB · Views: 204
One more, a pale pink/tanish Premium Jokeri. I think I mixed it a bit much.
 

Attachments

  • 0128142036a.jpg
    0128142036a.jpg
    118.4 KB · Views: 173
Here's another, if there's anyone left watching this thread.

The pics are the dye before I moved it, after I moved it around with a toothpick, and the finished disc. It's an Urge....feels remarkably like a Surge :rolleyes:

A pie pan the size of the disc like that seems to work prefectly, it makes it harder for the dye to spread out because it takes more force to push it up than out - towards the bottom theres only like 1/8 of an inch at most between the disc and the pan. Makes it easier to make a design.

Next one I am going to use an eyedropper with a smaller opening because I am convinced this would be way cooler if the inital lines of dye were very thin. I don't know if they make those though, maybe ill super glue one to be smaller.
 

Attachments

  • 0130141931b.jpg
    0130141931b.jpg
    88.6 KB · Views: 147
  • 0130141934.jpg
    0130141934.jpg
    85.5 KB · Views: 142
  • 0131142002.jpg
    0131142002.jpg
    108.3 KB · Views: 224
Here's another, if there's anyone left watching this thread.

The pics are the dye before I moved it, after I moved it around with a toothpick, and the finished disc. It's an Urge....feels remarkably like a Surge :rolleyes:

A pie pan the size of the disc like that seems to work prefectly, it makes it harder for the dye to spread out because it takes more force to push it up than out - towards the bottom theres only like 1/8 of an inch at most between the disc and the pan. Makes it easier to make a design.

Next one I am going to use an eyedropper with a smaller opening because I am convinced this would be way cooler if the inital lines of dye were very thin. I don't know if they make those though, maybe ill super glue one to be smaller.

I may have to try a pie tin sometime. I got a couple in some beds right now. I need some more star like plastic. Im still watching this thread for sure man just been busy working on my website. Your dyes are coming out pretty sweet. That dye bed looked sick. Nice job. What mix/dye and base are you using?
 
Most recent

I started with some rings, 5 of them, in chartreuse. Then prepared the "nebula" bed in baby wash (very thick) using iDye with laundry detergent and a minimal amount of acetone. Could not tell you the mixture as I always do them by sight.

Anyway I love how this turned out.
 

Attachments

  • IMG_20140126_230818_154 (1).jpg
    IMG_20140126_230818_154 (1).jpg
    81.7 KB · Views: 237
I started with some rings, 5 of them, in chartreuse. Then prepared the "nebula" bed in baby wash (very thick) using iDye with laundry detergent and a minimal amount of acetone. Could not tell you the mixture as I always do them by sight.

Anyway I love how this turned out.

Nice job! Looks sweet. Like the spin/neb combo. I got a lot of ideas to combine those, just need to pick up some more plastic.
 
What mix/dye and base are you using?

When I bought all the dye I have like 4 months ago, I mixed each packet with roughly 20 oz of water. My dye mix for these is roughly equal parts dye/water mix and fabric softener. The base is just about a 1/2in of laundry detergent.

I just ordered 1 packet of every idye poly color there is, and worm dye in yellow, blue, green, pink, and orange. I'm going to only use my dye mixed with water for stencils now, and make the dye I use for tye dyes / spin dyes more concentrated than I've been using. Can't wait to get my spin rig up and running too.

Also, I re-checked, and there is way less than 1/8th of inch between the disc and the pan, most discs fit snuggly in the bottom, I don't know where I got this thing but it is exactly disc-sized.
 
Nice job! Looks sweet. Like the spin/neb combo. I got a lot of ideas to combine those, just need to pick up some more plastic.

It was a random thought. Initially I thought one big ring on the rim and nebula in the middle. As soon as I got that one done more were just a necessity. Thanks.
 
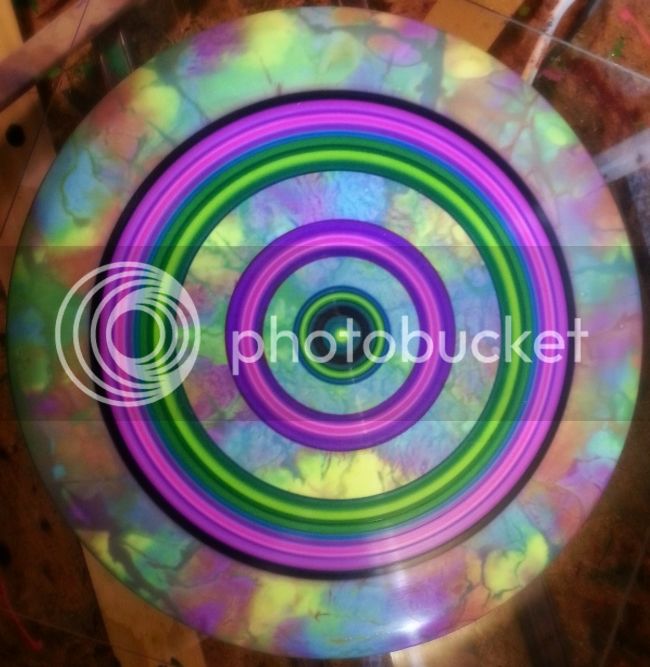
Here's my latest. Kind of a neb/spin combo...I posted this in the dye a day thread too, but figured why not light this thread up again :D

 
When you did both the neb and spin, does the spin just go over the Nebula or do you tape that area off?
 
Hey Odyssey, have you tried a nebula with worm dye yet?

I got my worm dye (just yellow, orange, pink, green and blue) yesterday, and also got my spinner up and running (I'll post some pics of it when I get home).

The worm dye just seems very very thin, so I am unsure how it would mix in a nebula dye, but would love to do some pink in future nebulas. doesn't matter too much though since my shipment of every IDye poly color is in tonight.:clap:

Also, are there any other colors you reccomend for worm dye? I totally agree that the bright colors work better - I was messing around on some old ace race discs, and the pink, yellow, and orange are vastly superior to the green and blue, especially the pink, I'm super stoked about the pink.

I probably wont be trying out the worm dye w/ the nebula style. Mainly because I dont want my discs lying in a bed of acetone (worm dyes are premixed w/ this) for any extended period of time and also I have been very happy with my results thus far using prochemicals, pylam, and Idye. I pretty much stick to using the worm dye for spin dyes only. I still use some of the other dyes for spin as well. Especially for the darker colors. The worm dye seems to set differently on the disc than a standard disperse dye. A few people on this site have tried using them. I believe their posts are a few pages back in this thread.

I would say if you are going to try it, you would want to mix it with laundry detergent just as you would a standard dye.

Also the green and blue still work pretty good but mainly for white discs. The blue can be useful for creating a "true" green I have found. I have been getting interesting purple tones mixing the hot pink and blue. Sounds like you have all the colors I have. I suggest just to play around with them and see what you like. I wouldn't waste your time with the black worm dye tbh. Idye kicks its ass anyday!
 
Here are some pics of my spinner.

It's just a cheap, $17 Wal Mart box fan, with a $5 dimmer switch in place of the 3-speed. Cut parts of the blades off so the walls would fit.

All in all, took me about 3 hours make, including going to walmart.
 

Attachments

  • 0205141808.jpg
    0205141808.jpg
    136.7 KB · Views: 93
  • 0205141809a.jpg
    0205141809a.jpg
    133.2 KB · Views: 80
  • 0205141809b.jpg
    0205141809b.jpg
    133.2 KB · Views: 87
Couple more.
 

Attachments

  • 0205141810d.jpg
    0205141810d.jpg
    127.3 KB · Views: 127
  • 0205141810e.jpg
    0205141810e.jpg
    112.2 KB · Views: 109
this might be a dumb question, but i am wondering how you guys get such perfect edges and defined lines when you do your spin dye rings (wondernut) style. I cannot figure out how you do this. please enlighten a dying newbie. thanks in advance
 

Latest posts

Top