• Discover new ways to elevate your game with the updated DGCourseReview app!
    It's entirely free and enhanced with features shaped by user feedback to ensure your best experience on the course. (App Store or Google Play)

"Nebula" Style Dye Tutorial

Odyssey113

Birdie Member
Joined
Aug 5, 2013
Messages
348
"Nebula" Style Technique

So to the best of my knowledge, I strongly believe that this is the technique that has been used by respected disc dyers such as Wondernut and Jeff Ash (aka Brainwave Discs) to achieve the so called "nebula" style dye effects, as it has been referred to by many in the disc golf community. It is very similar to the effects you can achieve with the common shaving cream techniques but has its own unique qualities and end result. I mean no disrespect to the originators of this style of dyeing by sharing this, but I would like to share my findings of this technique whether or not it is the same technique that they are using. This may also be a technique that others are already doing so I in no way take credit for this. In fact a lot of the ideas I got to try this method out came from other fellow disc dyers and their suggestions (special thanks to bmxpunk01 and goosefraba1 for sharing ideas that led me to trying this). Here is what I am doing currently to achieve these effects.

Tools and Items needed:
1. Dye of choice ( I used a pro chemicals disperse dye for this tutorial. I am sure other dyes should work as well for doing this)
2. A plate (or something similar that has almost the same shape as the top of the disc. Mixing bowl, etc. Use your best judgement. I prefer a plate that will perfectly fit the shape of the disc so it sets nicely)
3. Dish soap or laundry detergent. ( I am still testing both of these to see what works best. So far it seems that laundry detergent mixes best with the dye for the dye mix anyways)
4. Eye dropper or something to apply your dye mix.
5. Glasses/Cups/Bowls to mix and hold your dye/detergent mixes.
6. Stirrer of some sort. (I use a chop stick)

Instructions:

Step 1 – Add a base layer of detergent or soap to the plate. I prefer to add just enough to create a little buffer between the plate and the disc. Not so much that its floating in a ton of detergent. Remember you will be adding your dye mix to this and you don't want it to become too diluted.
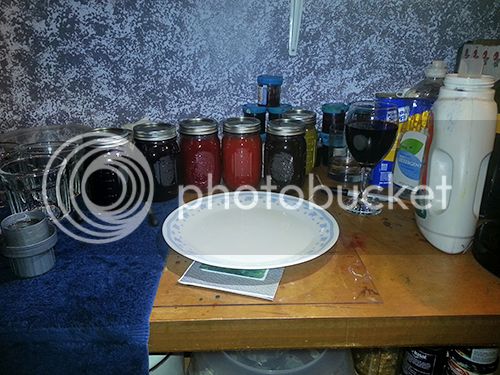

Step 2 – Mix a small amount of detergent in separate cups or glasses. More or less depending on how much of each color you want to use and how dark you want the final result. Add several eye droppers full of premixed liquid dye to the detergent. Gently stir until you achieve a nicely mixed detergent/dye ratio. I like mine slightly thick but still on the runny side, just not too watered down.
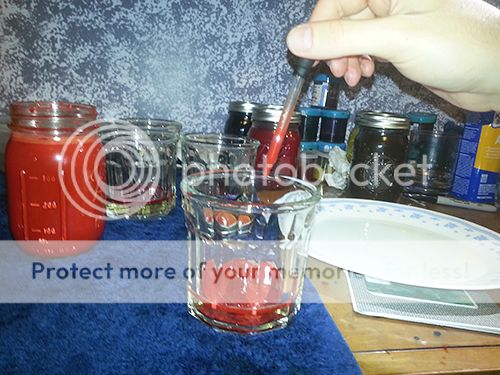
Repeat process for all the colors you wish to use.

Step 3 – Once you have mixed all of your dyes with detergent, begin applying them on the plate as you wish. Have fun with it. I do suggest to be careful about over mixing the colors if you want the colors to stand out on their own. They can blend very easily with this method so remember that less is more, unlike the shaving cream method where you can pretty much go to town with a toothpick or utensil and create various designs in the shaving cream, the soap/detergent allows the dye to blend very easily. When done it should like a primordial ooze
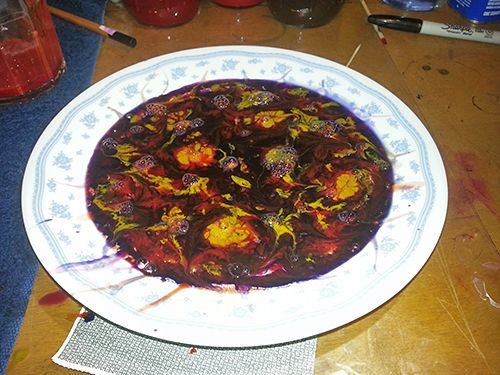

Step 4 – Very carefully place your disc in the dye mix and be careful not to move it around. Let it sit for anywhere from 8-12 hours or more depending on the shade you are trying to achieve. My first try I pulled it after 6 hours and while it came out nice, I think an extra few hours would of allowed the colors to become a little darker.

Here were my results with this one. I was quite pleased. So was Mindy :D
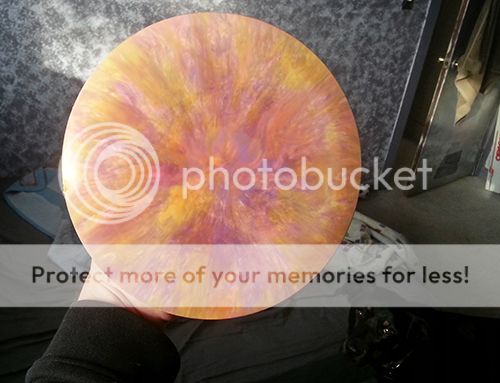

Step 5 – Experiment with these steps and share your results. We can all learn from each other and what we are doing to get better at this fun style of dyeing discs.

Step 6 - Have fun!!!
 
Ugh, now I am going to be even more impatient to receive my packages. That looks great, well done.
 
it should be noted that the glass of wine (or other beverage of choice) is critical to the success and fun of the process! :thmbup:
 
it should be noted that the glass of wine (or other beverage of choice) is critical to the success and fun of the process! :thmbup:

Absolutely. That and good music are an essential part of the dyeing process! ;)
 
looks great, Odyssey! I'm looking forward to the post-holiday dye stock-up I have planned. Definitely going to be trying this with a disc soon.
 
I have to see what discs I have laying around - after reading your instructions, and thinking about this, I stumbled on this:

http://chemistry.about.com/od/chemistryactivities/a/densitycolumn.htm

I'm thinking if the bottom layer is karo syrup, you could "pull" more designs into the laundry detergent dye mix and keep them a bit more separated, then using all detergent.

I believe that since the detergent is slightly less dense, the two could potentially remain separated during the dye process... I'm hoping to try this either tonight, or tomorrow night with my current iDye supply... I just hope I have a disc!
I had wondered if there was something that had a relative density high enough to be used as a better base than detergent, while still being fluid enough to allow the disc to displace it. Never bothered to look. Great information in there.

Thank you.
 
I believe a bit of both - but my thought is actually backwards, there -

This is what I want to try - In a pie pan, just big enough for a disc to fit into,
*lay down a bed of detergent, thin - just enough to float a disc
*add a dye-syrup mix to make the design (heavier/thicker than detergent)
*Set the disc on top, and place just a bit of weight (maybe a shot glass), on top, so it forces the syrup to displace the detergent and keep either from 'floating' on top of the other one

I'm hoping for this type of result:
attachment.php
 
Last edited:
This one I did last night I actually used dish soap for the base and detergent for my dye mix. Just an FYI since i don't think I specified in the tut. I'm curious how that karo syrup will work for you bmxpunk. Let me know how that goes.
 
I missed the difference in detergents - I'd love to see one done w/the worm dye. I was trying to scan through pics to see the range of colors that were used that "popped" so brilliantly off the discs. I'm really hoping the prodisperse dye or worm dye is it!
 
Lots of things to try! I try to think of cheap things that I can easily get my hands on - dish soap, cheap shampoo, etc.

I've done shaving cream dyes, and as mentioned above, you can get almost any range of sharpness or blurriness by how watery it is. With not much water, the design will come out pretty much intact. I really like the blurry ones though!
 
I missed the difference in detergents - I'd love to see one done w/the worm dye. I was trying to scan through pics to see the range of colors that were used that "popped" so brilliantly off the discs. I'm really hoping the prodisperse dye or worm dye is it!

Only downside if I was to mix the worm dye is that if you wanna keep the stamp, the acetone would do damage im sure. Plus i don't think an extended bath in acetone would be good for the disc. Im curious to see how just a straight up idye bath would turn out, with and without the dye carrier and wetting agent. Im running low on discs though. Time to hit up the used section again.
 
I believe a bit of both - but my thought is actually backwards, there -

This is what I want to try - In a pie pan, just big enough for a disc to fit into,
*lay down a bed of detergent, thin - just enough to float a disc
*add a dye-syrup mix to make the design (heavier/thicker than detergent)
*Set the disc on top, and place just a bit of weight (maybe a shot glass), on top, so it forces the syrup to displace the detergent and keep either from 'floating' on top of the other one

I'm hoping for this type of result:
I was thinking you meant the karo on the bottom and then "build" your design on top with the dye/detergent or dye/carrier/wetting agent mix on top. Since the karl syrup is a heavier substance there would be less chance of the dye mix sinking in and not touching the disc. At least that's what my brain is thinking. I think I may give it a try with my idye and water mixes. My guess is the karo syrup (or corn syrup)is heavy enough for the water/dye to float on top leaving full contact with the disc surface.

I can see where floating may be an issue as then the dyes can be pushed freely when placing the disc.
 
I'm trying the dye in the karo, with a shallow bed of detergent. I'm thinking the other way is the better idea, or my detergent bed is too deep. I'll post results tomorrow...
 
I'm trying the dye in the karo, with a shallow bed of detergent. I'm thinking the other way is the better idea, or my detergent bed is too deep. I'll post results tomorrow...

I did not make it to a store tonight after work, so mine will have to wait til this weekend. Or maybe I'll be in the mood after the brewery visit to Karbach tomorrow. We shall see.
 
I missed the difference in detergents - I'd love to see one done w/the worm dye. I was trying to scan through pics to see the range of colors that were used that "popped" so brilliantly off the discs. I'm really hoping the prodisperse dye or worm dye is it!

Im leaning towards thinking that their are two types of dyes being used for this style of disc dyeing. I think prodisperse is definitely one of them, most likely the exact dye that was being used by Jeff Ash back in the day and I believe wondernut has used this on some of his as well. If you compare the colors I got on this last dye they have the same cream colored look to them that some of Jeff's discs had on them. I'm 99% sure that this is the same dye. Just my feeling on it. Not to mention Jeff was the one that had told us this tip + his fb comment. Only makes sense.

The one that you posted that I assume is a wondernut dye... my theory is either he is doing a similar technique using idye poly either by itself (maybe mixing colors or using a lightening agent such as that Formula 49), or maybe he is mixing idye poly with the dye carrier and wetting agent to achieve these results. The one time I did get Wondernut to answer my dye question on FB about what dye he uses, he had said that he uses Idye poly.

Either way I would suggest if you are going for colors that dark and saturated, double my suggested sit time. Do most likely 18-24 hours, cause those colors are really vivid
 
There are a number of other disperse dye makers that may well be included in this idea. Most of them I found over the last several months are in China or India, so the cost is prohibitive. However, there is one other one that does not have pictures of the actual colors and seems to be more of a bulk seller. There is no option to purchase directly online. The list is long though.


http://organicdye-px.rtrk.com/dyes/disperse-dyes
 
Well, the detergent bed was either too deep, or, JohnnyPhive was right - the karo should be the base (how I'm leaning now, too)

Putting the disc into a karo base tonight. No results to post today, as 90% of the dye sunk under the detergent during the soak.
 

Latest posts

Top