• Discover new ways to elevate your game with the updated DGCourseReview app!
    It's entirely free and enhanced with features shaped by user feedback to ensure your best experience on the course. (App Store or Google Play)

Help Appreciated!

Fidelities

Newbie
Joined
Jun 25, 2013
Messages
5
Location
Cincinnati
xBiVdpvl.jpg


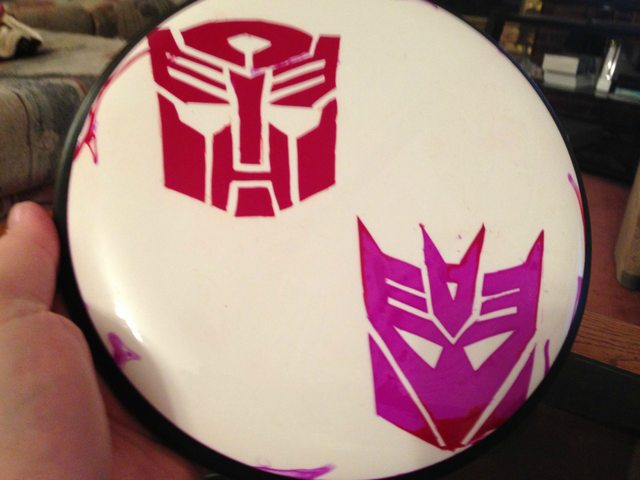
I tried my second dye last night and it returned mixed results. While overall I am happy, I still had a bit of bleeding and some overlap of the two colors I used (purple and red). I had cut both designs out but not weeded and then covered the upper left (Autobot design) with contact paper before weeding and dyeing the bottom right (Decipticons logo) before repeating the process and dyeing the other color.

While I have read most of the forum stickies, I haven't seen much info on dying multiple colors so I would appreciate any tips. Bleeding seems to be my biggest problem. Please help!

Also, since I already have some swirls of purple/red because of the bleeding (and sort of like the added flair) and lots of white space left, how might I add some purple/red swirls or such without messing up the designs already there? (Covering again and using a shaving cream dye with swirls?) Thanks for any helpful tips or constructive criticism!
 
yup put it in some shaving cream. same colors do not use too much dye to leave some white and have fun. the logos should survive as long as you dont go crazy.
 
The fastest improvement you're going to see fixing bleeds is by changing the material you're using; contact paper is nice to start with, but the glue dissolves pretty quickly.

My personal recommendation for starting is Oracal 631. You can remove and replace the vinyl a couple of times on the disc while you're still learning the process; once you feel confident with 631, you can move up to Oracal 651, which is thinner and stickier. A 10 yard roll is good for about sixty dyes and should run you $20-$25.
 
If you paint on some vasoline over your transformer symbols it will keep the dye off of them if you go the shaving cream route.

Normally when doing a multi color dye you remask for each color. So you would first just lay down vinyl/contact paper with just one symbol cut out. Then when finished with that color, remove all vinyl, wash and dry the disc, and put a new sheet of vinyl down with the other symbol cut out and make sure it is in the location that you want. if you then wanted to die the whites without anything touching the symbols, you remove all vinyl, put on a blank sheet of vinyl and trace out your symbols with an exacto knife. you will be cutting the vinyl on top of the desk so be careful with the amount of pressure you use. obviously transparent vinyl is nice for this, but if you have thin white vinyl, a light table also prove to be useful.

One more note. not only does Remasking with vinyl take extra time, it also removes or pulls off some of the dye color/s previously done. The options here are a cheap ReMask, which is like what you did. overlay a large piece of vinyl, Elmer's glue, or rubber cement on the 1st color and then weed out second color. the problem is that overlapping pieces of vinyl can create points of entry for bleeding to occur. Elmer's glue, rubber cement, and Vaseline all wash off overtime so you can see the potential problem here with dip dying.

what I do now for any multi colored dye is I make sure everything has a black outline like a coloring book page, and then I use a painting method with either deturgent or acetone to color in my coloring book page. this method works a lot better if you have a whole bunch of small areas to put color on rather than a few a very large areas to put color on.

alright that's a lot of information I hope it helps. feel free to ask any questions and I'm sure other Dyers will put in their tips as well.
 
Top