• Discover new ways to elevate your game with the updated DGCourseReview app!
    It's entirely free and enhanced with features shaped by user feedback to ensure your best experience on the course. (App Store or Google Play)

Noobie Dye Question Thread

Cloudkicker,

When you placed the disc into the SC, did you "push" it down? Looks like the dye moved early during the process. How long did you leave it in?

If you want a design that holds closer to what it looks like before you put the disc onto the SC, go with a shallow bed of SC, in a plate or dish that doesn't allow the disc to sink as much. Also, keep your designs closer in toward the center.

From what I can tell in the pics, your SC consistency looks OK. I think even straight SC will let a disc sink (though I've never tried it).

Best thing to do is get some "beaters" and experiment! I've been dyeing for a couple of years now, and still seem to learn something new with every dye!

I hope others will chime in on this for you too. I am by no means an expert when it comes to SC dyes!

Peace,
-Jeff
 
Thanks Jeff, I made sure not to push down and let it sit for about 20 hours. The edges were much thinner than the rest of the cream.

Im redyeing the border now with a much thicker and shallower bed. Appreciate the response and the advice.
 
Last edited:
Here are my first disc dyes, maybe others can learn from my mistakes.

http://imgur.com/ncRlk2l
I had to dye the mako twice. The first design I made was too big and the shaving cream was too thin. So most of my design was lost. I re-dyed the border blue.

http://imgur.com/jpC8MHs
I used the Elmer's glue technique for the shark. I let it soak for about two hours in blue dye and the glue started peeling off which caused bleeds and crack like designs on the stripes. The second dip was in red dye. I mixed acetone with the red and soaked it for about 10 mins. The acetone made the red take much faster and its much brighter than the blue. The glue held up and the design came out perfect. Just don't leave your disc in acetone for too long as it will eat into the plastic.

Any suggestions/tips are welcome.
 
First off, sorry if I don't have the words for this but, how do I take a photo like this:

and change it into something that I can hand cut out like this:

I messed around a little with lunapics but I can't figure it out.
 
I would do it by hand because I suck at computers. I have done 2 dog discs like that; tracing only the definitive lines and then hand painting the shading. Can only find the pic of one of them right now.

I imagine that if you wanted a more "stencily" look you could trace the lines of the shadows as well and do a multi-shade black dip.
 

Attachments

  • millerdisc.jpg
    millerdisc.jpg
    103 KB · Views: 27
^^ Most imaging programs will have some sort of 'posterizing' filter. You could first convert to black and white then boost your contrast and adjust brightness then you should be able to choose how many 'layers' or shades you want. I forget what program I used to use, but it allowed you to choose the number of colors/shades you wanted from 2 (black and white) up to as many shades you wanted.
 
Thanks DTP and Rog! That's a good tip to try and do it by hand. I haven't tried painting yet. I am decent at multi-shade black dips. What is the mixture for painting? Acetone?

DTP,
I will definitely experiment with some of the programs. These steps of posterizing, black/ white, contrast, brightness was exactly what I was looking for. Anymore tips from you or anyone on the steps or a program would be greatly appreciated.

In my short time of dyeing, I have found that one thing people love is their dogs!
 
Has anyone else ever pulled part of the disc off when removing vinyl? On a few L64 gold line discs, and an ESP buzzz I have had the very top layer o the disc get pulled up when removing the vinyl. I guess gline has a really really thin clear layer of plastic over the disc... Wondering if I'm the only one who has done this.

On that hawks Buzzz in dye a day thread, you can see where this happened. It's the left side of the green feather about halfway down. Pulled the top layer up so I had to cut what was pulled up off. Seems like dye gets through this layer though since not much color difference.
 
Has anyone else ever pulled part of the disc off when removing vinyl? On a few L64 gold line discs, and an ESP buzzz I have had the very top layer o the disc get pulled up when removing the vinyl. I guess gline has a really really thin clear layer of plastic over the disc... Wondering if I'm the only one who has done this.

Yep, I did this on an ESP Comet and an older Star Leopard. On the Leopard, I could see some small bubbles on the disc before I did the dye, and that's where I had trouble.
 
Anyone know how Legacy Gravity plastic dyes? It feels kinda pro-ish, so I am thinking probably not well, but I have never dyed anything Legacy before...
I know its been a while since you asked this question but as far as I can see no one has answered. I did a shaving cream dye on my Gravity Clutch. It didn't take super well. the design is there it just came out very faded looking.
 
I'm doing some stencils tomorrow and need some guidance.

I want to do a seamless pattern on the top flight plate but don't want the rim to be dyed. Just the inside circle. I've seen discs dyed in this way but I'm not sure about the best way to approach it.

Any tips?
 
I'm doing some stencils tomorrow and need some guidance.

I want to do a seamless pattern on the top flight plate but don't want the rim to be dyed. Just the inside circle. I've seen discs dyed in this way but I'm not sure about the best way to approach it.

Any tips?

Just keep your vinyl mask all the way around the rim and you should be fine. I'd suggest cutting the vinyl first, and OFF the disc. Make sure the piece is at least an inch bigger than your disc on all sides, and you'll be able to mask off the rim without dyeing it.
 
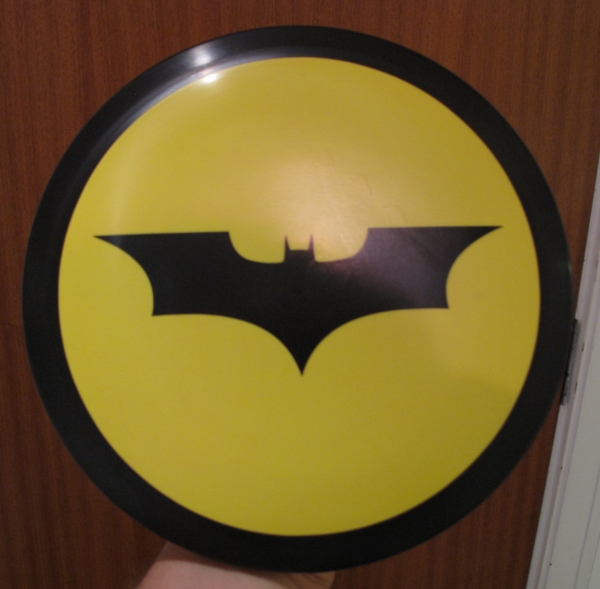
Thanks for the quick reply bennet. Here's an example of what i'm trying to do.

XkWUh2c.jpg


I want to keep the black part of the rim masked while I dye a pattern on the yellow part. But The pattern I'm using will overlap that black rim.

I suppose I could use a compass to draw the circle I need and keep that part masked. Didn't think about the compass until just now.
 
Since it's black, you won't really have to worry about it being perfect, since it won't change much being black already. What pattern are you wanting to put on the yellow?
 
That's not the actual disc I'm dyeing, just an example of how I want mine to turn out. I intend to keep the black rim masked to keep it the discs original color. So the rim won't actually be dyed at all.

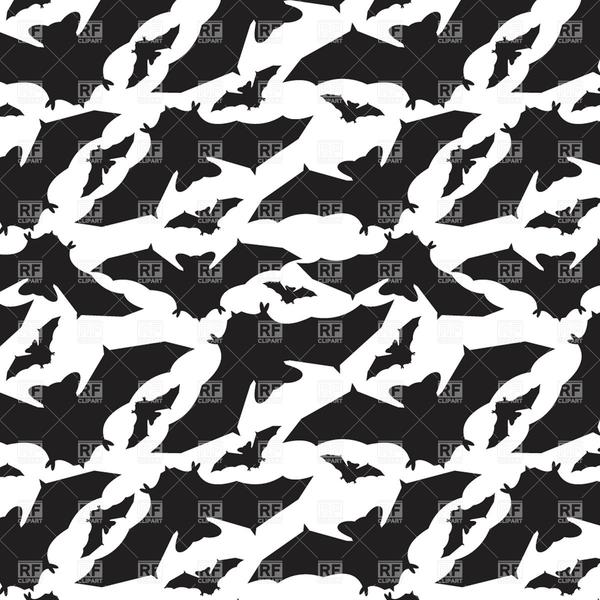
I want this bat pattern to cover all of the yellow area in the pic above but don't want to pattern to be on the area where the rim is black in the above pic.
Re7lhWN.jpg


So the rim and all the white area in the pattern will be the original disc color. I'll cut out and dye the bats.
 
Assuming you have a light board, or some way to cut off the disc. Put the image on your board, then use a compass to make a circle the size of the flight plate, then only cut within the circle.

With a light board on, you can place the disc upside down and see the image through the disc. Do that, and line up your circle with the flight plate, then trace around the disc on the vinyl. That way you can use the larger circle to line up the disc correctly when you transfer.
 
new to disc dyeing

I am new to disc dyeing. I have always been good at drawing and would like to put some of my own designs on discs. Seen all kind of ways people talk about doing it. I would prefer to paint it on. What's the best stuff to use? Ratios? Also love the way some look with a design but then have the shaving cream background. How is this done. Is there a good tutorial video? Help appreciated.
 
I am new to disc dyeing. I have always been good at drawing and would like to put some of my own designs on discs. Seen all kind of ways people talk about doing it. I would prefer to paint it on. What's the best stuff to use? Ratios? Also love the way some look with a design but then have the shaving cream background. How is this done. Is there a good tutorial video? Help appreciated.

Check out this thread for tutorials on shaving cream dyes as well as a lot of other helpful information.

As far as painting, I've found the best ways (in my limited experience) to be two fold;

1: Mix a small amount of your dye (iDye Poly) with 1-2oz of acetone. This creates a quick drying dye that will be easy to paint with and familiar consistency to anyone who uses water colors. Careful not to have too much on your brush as it will run easily. This is my preferred method.

2: Mix the dye with uncolored dish soap. This creates a thicker dye that will not run, but also does not set into the disc nearly as fast. This requires you to allow each layer of "painting" to set and then be washed off repeatedly. It is much more time consuming, however, it will also allow you to have more control over the thinner acetone mixture.

Hopefully Bennett or DyeingToPlay can shed more light from their infinite painting and shading experience.

Cheers.
 

Latest posts

Top